A guide to managing your menu on Wolt
Learn how to easily add new menu items, options, and categories, as well as update photos, prices, and item availability on Wolt.

In this guide, we'll show you how to update menu pricing, mark items in and out of stock, and make sure your menu stands out by adding photos to showcase your offerings in the best way to increase sales.
Overview
What menu changes can I make through Wolt? How to add new menu items on Wolt How to edit an existing menu item or menu pricing How do I mark an item out of stock? How to add/edit menu photos What is the Merchant Portal? What is the Merchant App?
What menu changes can I make through Wolt?
You can use the Merchant Portal for all menu updates such as:
Add new items
Add options to items
Add new categories
Change information about existing items
Deactivate items
Adjust prices of existing items
Manage the availability of items (e.g., breakfast dishes)
How to add new menu items on Wolt
Learn the simple steps to manually add new menu items or upload them via file. Find out how to add new options and create categories or better organization and display, all aimed at driving more sales.
💡 Hot tip: Did you know that offering side dishes, drinks, and desserts as add-ons to your main dishes can increase your basket size by up to 6%?
How to add new menu items manually
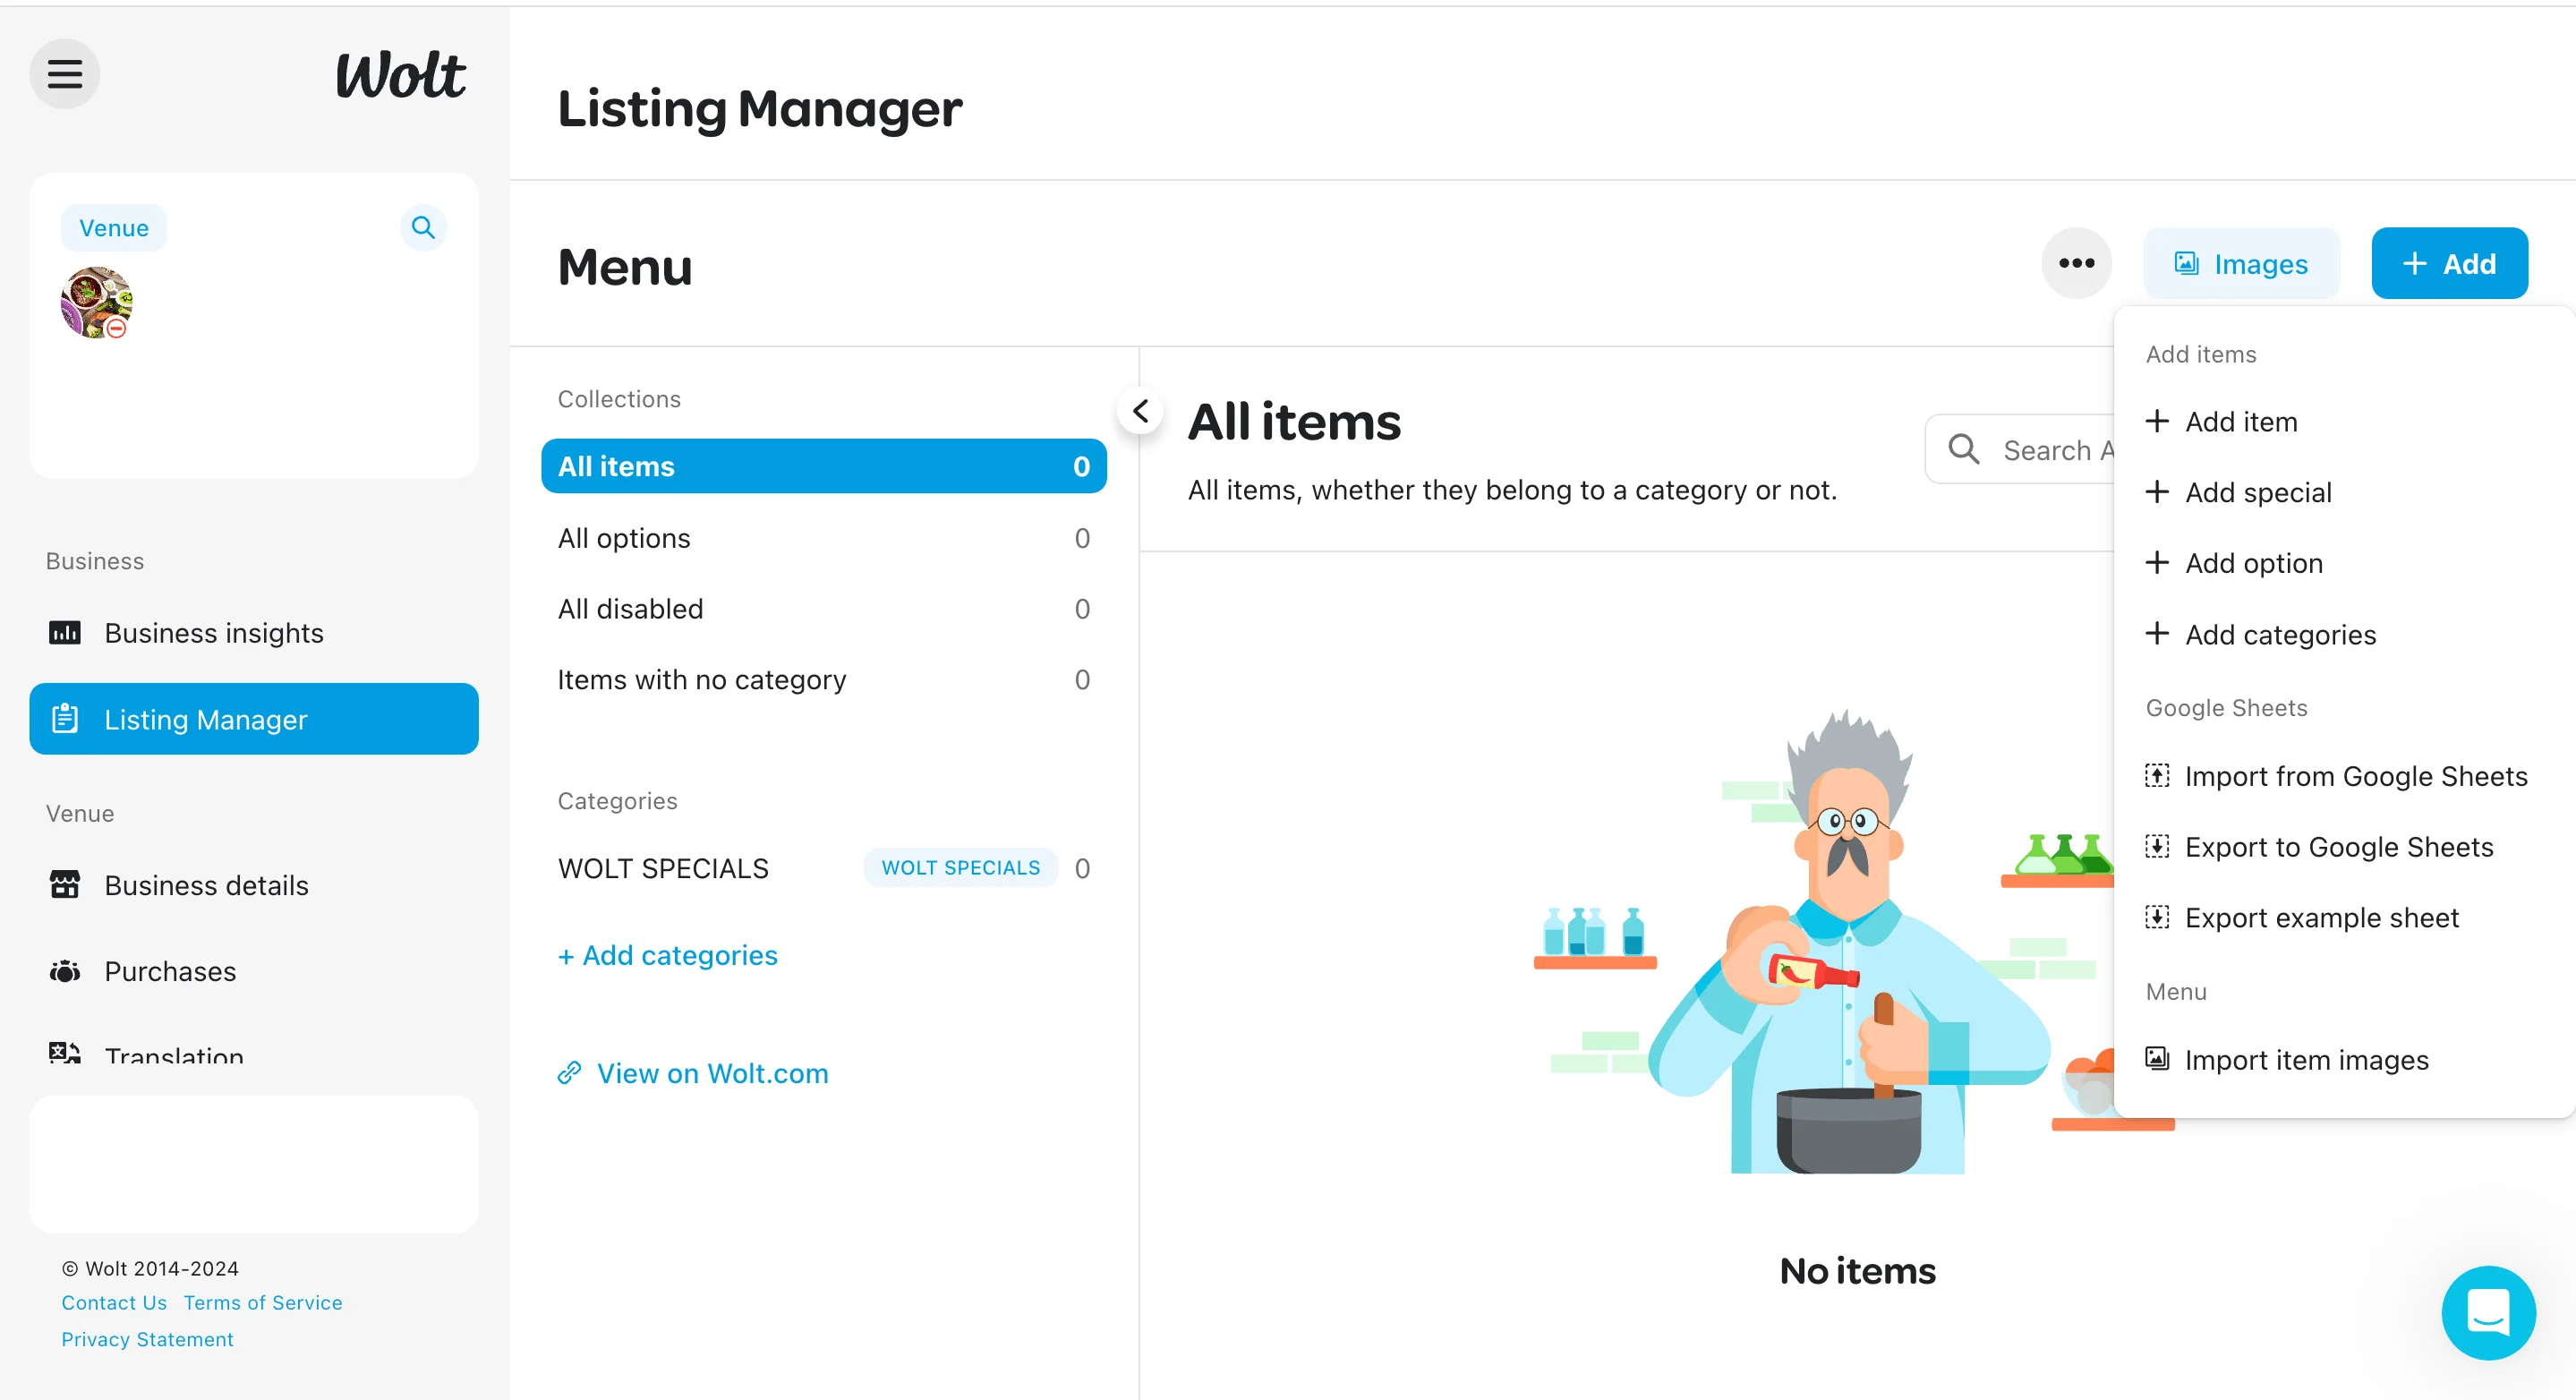
1. In your Merchant Portal account, select “Listing manager” in the left navigation tab. 2. Click on “+Add” on the top right corner of your screen. 3. Select “+ Add item” to open a screen where you can enter all the relevant information for your new item like item name, description, price, VAT, allergens and additives, and alcohol information. 4. FIll out the required fields along with any other additional fields you would like. 5. Click on “Save”.
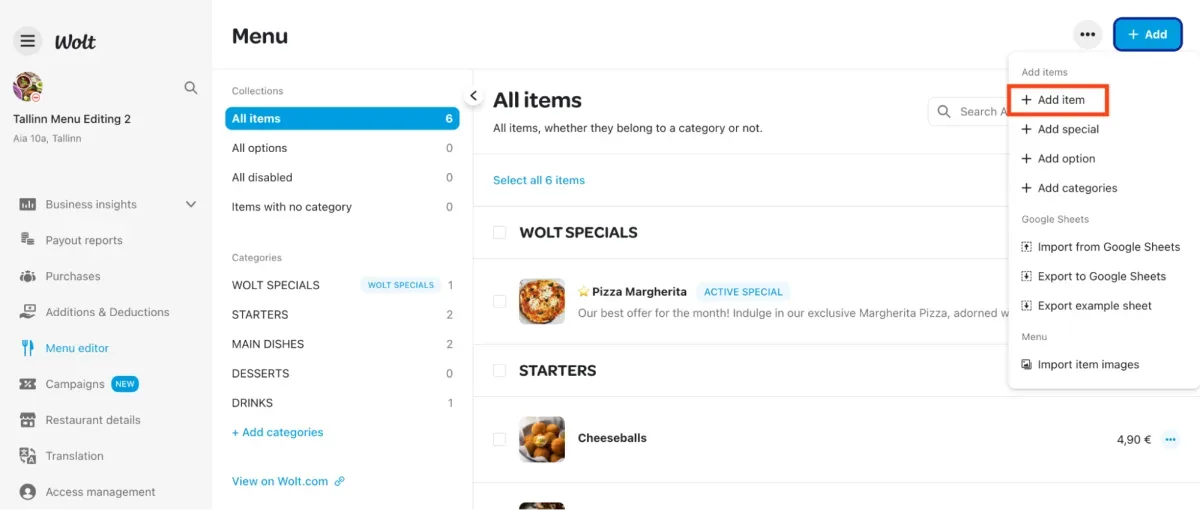
Tip: When adding alcohol to your menu, include the correct percentage and mark it as age-restricted under "Advanced" to comply with local laws.
How to import or export menu items
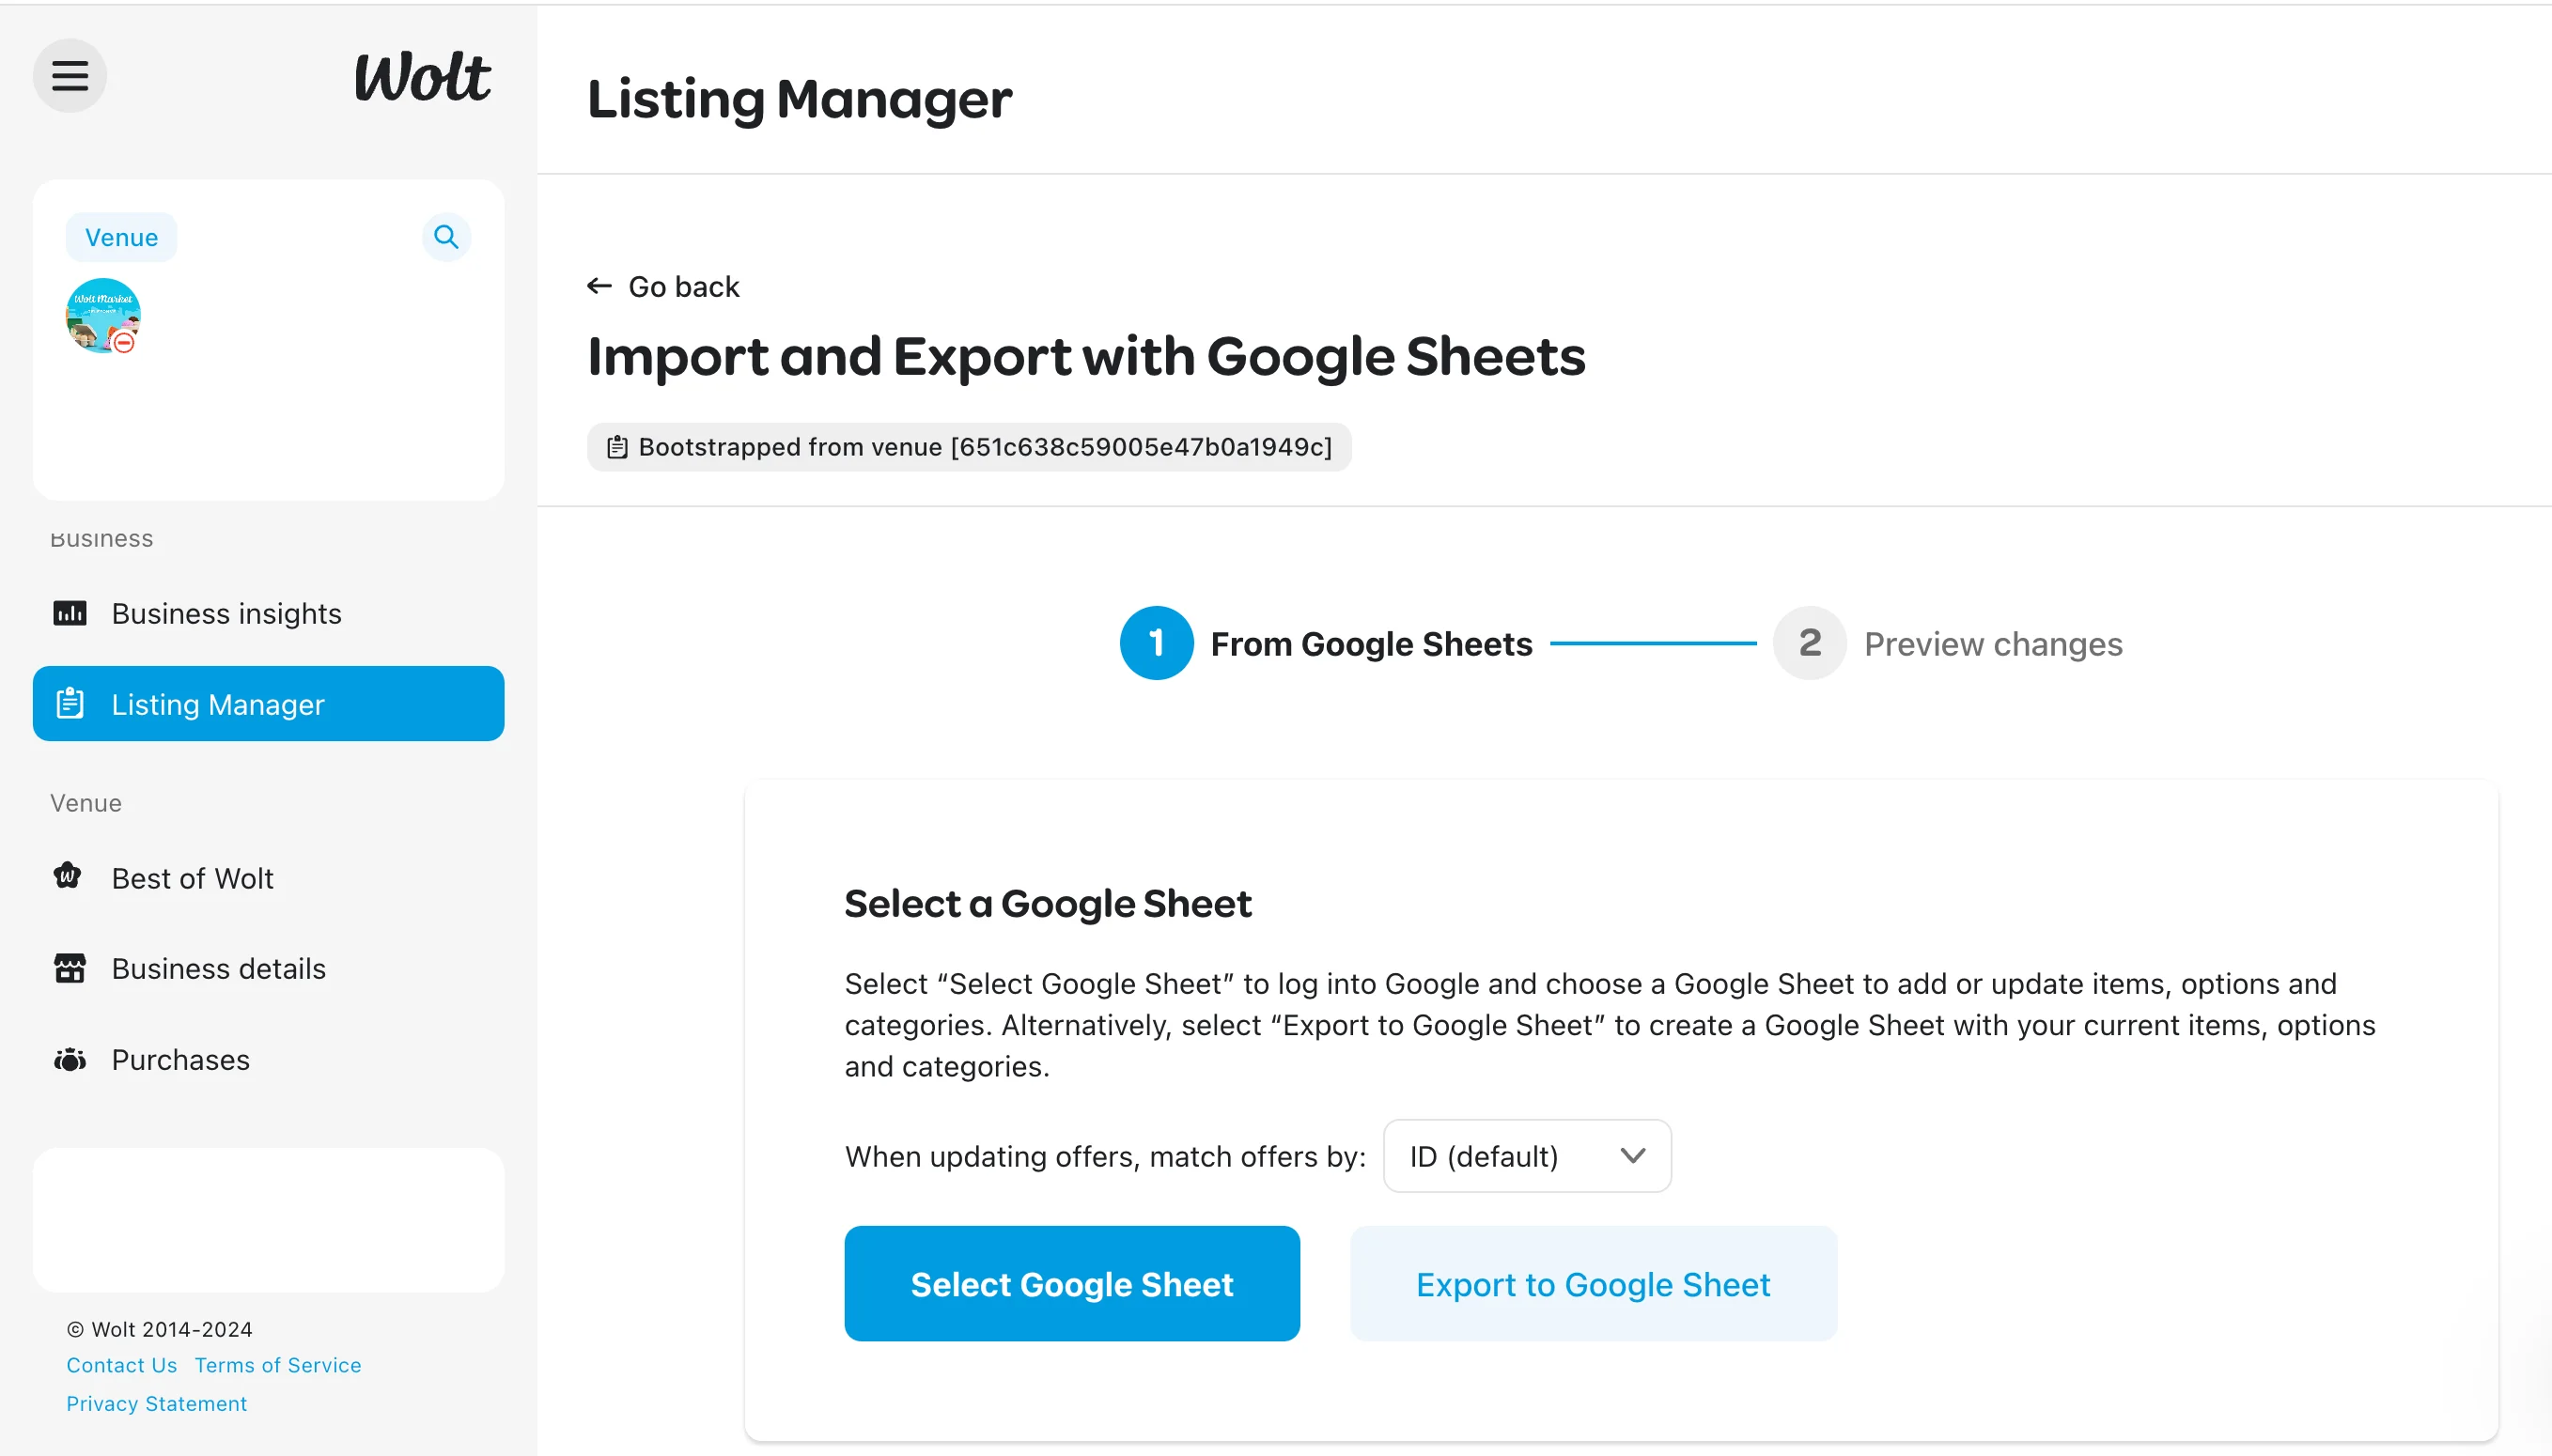
1. In your Merchant Portal account, select “Listing manager” in the left navigation tab. 2. Choose between the three available import options, which are:
Import from Google Sheets
Export to Google Sheets
Export an example sheet
How to add options to items
1. In your Merchant Portal account, select “Listing manager” in the left navigation tab. 2. Click on “+Add” on the top right corner of your screen. 3. Select "+ Add Option" to open the option creation screen.
Choose "Single choice" for options where customers make one selection, such as choosing a soda or selecting the type of meat for their burger.
Choose "Multiple choice" for add-ons, where customers can select multiple options, like adding bacon to a burger or upgrading to a full meal.
4. Enter the "Choice title" and add the available option choices. 5. Once you've filled out the details, click on "Create option" to save your changes.
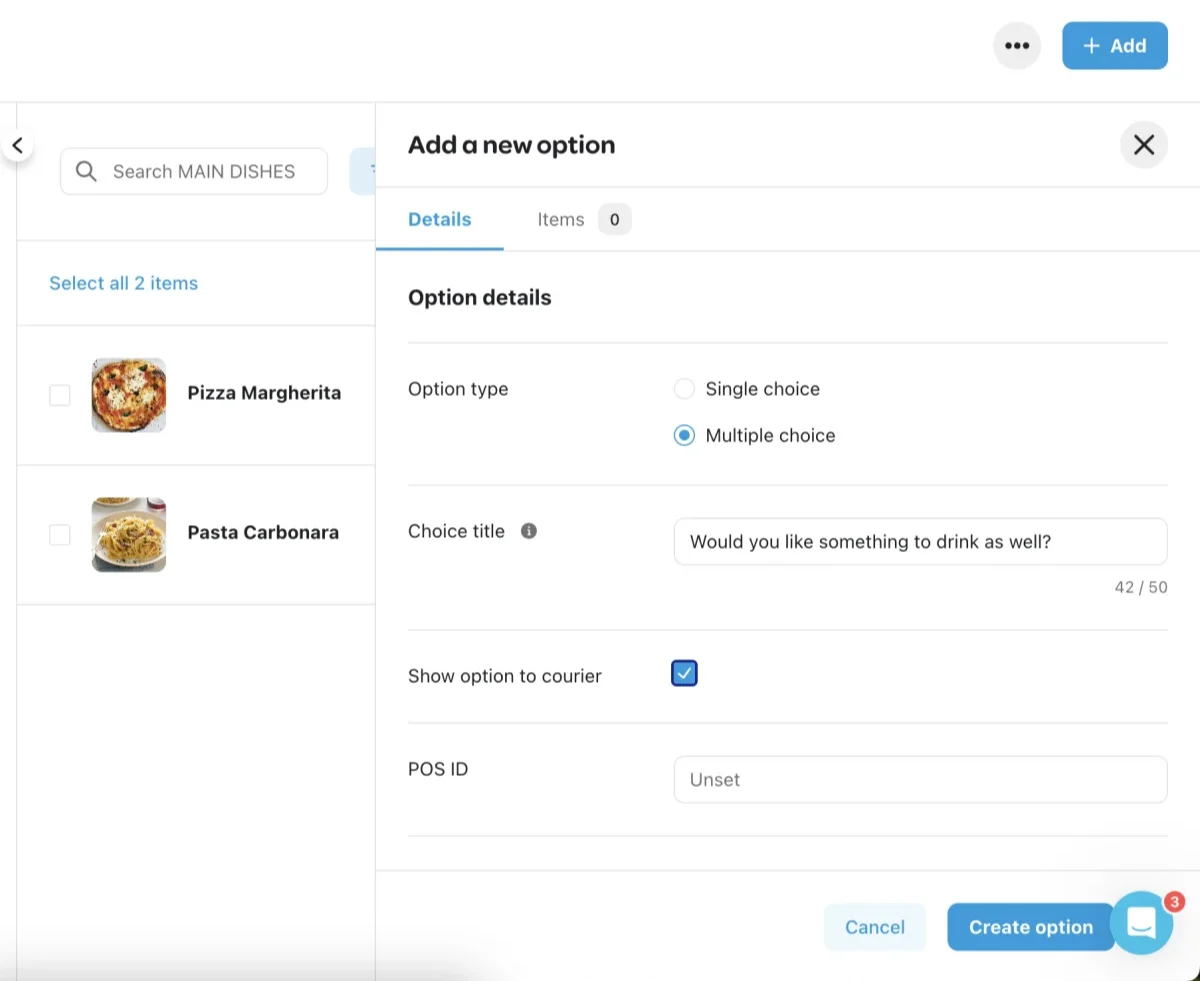
After creating the option, link it to an item by following these steps:
1. Click on the item you want to link the option to. 2. Choose “Options” from the item’s top bar. 3. Click on “+ Add option”. 4. Tick the box next to the option you wish to add. 5. Click “Done” to finalize the process.
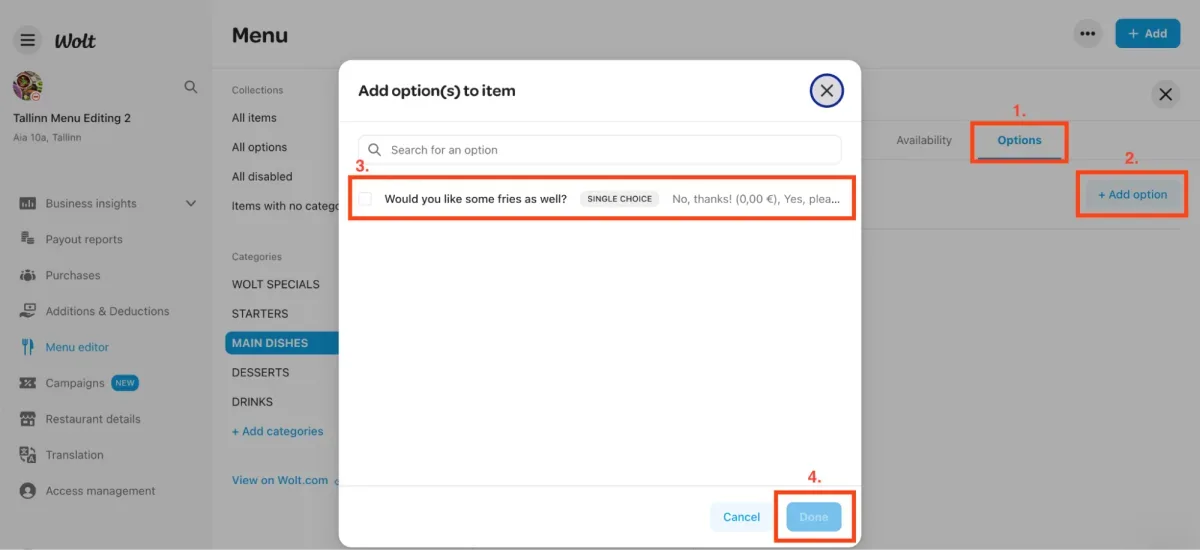
How to add new categories
To make your menu easy on the customer’s eyes, you can create and organize your categories in the order where starters are first, then the main selling point of the menu (combos) followed by single dishes, main courses, sides, and desserts.
1. Log in to your Merchant Portal account. 2. Click on "Listing manager" in the left navigation tab. 3. Click on “+Add” on the top right corner of your screen. 4. Select “+ Add category” to open a screen where you can add new categories to your menu. 5. FIll out the required fields along with any other additional fields you would like. 6. Click on “Save”.
How do I edit an existing menu item or menu pricing?
Keeping your menu information up-to-date is important in ensuring your customers stay happy and satisfied. Follow these simple steps to easily edit an existing menu item.
How to edit menu items or pricing from the Merchant Portal
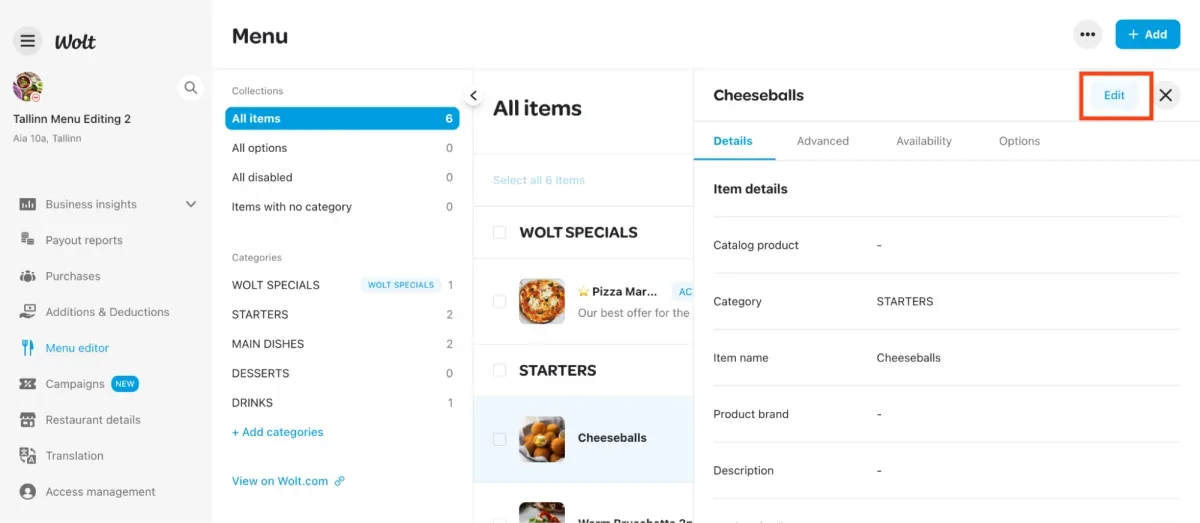
1. Log in to your Merchant Portal account. 2. Click on "Listing manager" in the left navigation tab. 3. Search or select the item you wish to edit from your menu. 4. Click on the specific menu item to open a screen where you can view details of the item. 5. Click “Edit” to make all the necessary changes to the item. 6. Click on ‘Save”.
How to modify an existing option
1. In your Merchant Portal account, select “Listing manager” in the left navigation tab. 2. Find the “All options” collection, where all your previously created options are stored.

3. Click on the option you want to modify. 4. In the options page, click on the “Edit” button in the upper right corner and update the option details as needed. 5. Once you’ve made the necessary changes, click the “Save” button in the lower right corner of the option page.
How to change menu item description from the Merchant Portal
1. Log in to your Merchant Portal account. 2. Click on "Listing manager" in the left navigation tab. 3. Search or select the item you wish to edit from your menu. 4. Scroll down to the “Description” field and enter the new description you want for the item. 5. After updating the description, click the blue “Save” button in the lower right corner.
How to edit menu items or pricing with an integrated POS (Point of Sale) system
If your Wolt menu is linked to a POS system, direct edits through the menu editor aren’t possible. For any changes, contact your POS system provider's support for detailed instructions on updating your Wolt menu.
How do I mark an item out of stock?
When an item is out of stock, you can easily temporarily deactivate the item. Below are three ways you can do this.
How to deactivate items on your tablet/Merchant App
You can deactivate the items in your menu directly through your Merchant App by:
1. Click the ☰ icon on the top left of your Wolt app screen. 2. Access the "Listing manager". 3. Select the menu item you want to deactivate. 4. Click on “Disable item”.
How to enable or disable items through the Merchant Portal
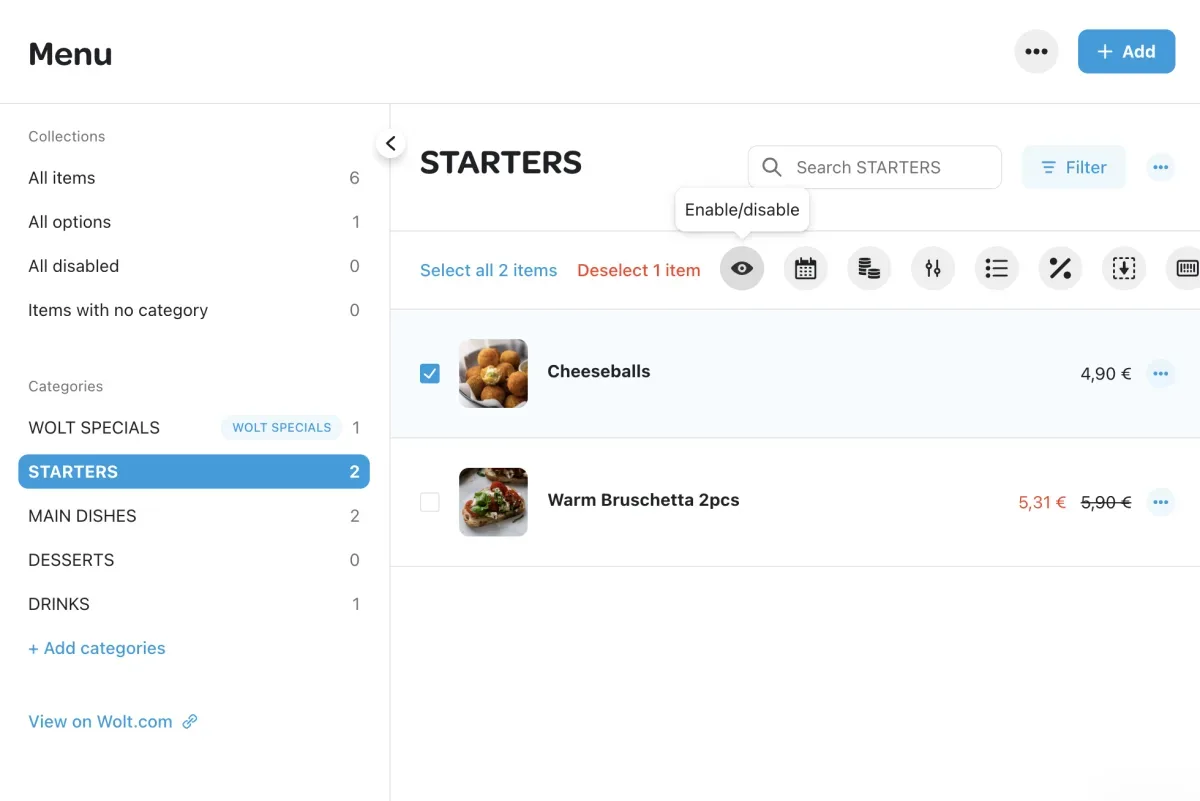
1. Log in to your Merchant Portal account. 2. Click on "Listing manager" in the left navigation tab. 3. Search or select the item you wish to edit from your menu by clicking on the white box and click the round eye (Enable/disable) icon on the top bar. 4. Choose the desired action and confirm it by clicking the “Enable” or “Disable” button.
How to add or edit menu photos
"We eat with our eyes first" is a saying that perfectly explains the importance of food pictures. Here’s why having pictures on your menu is important:
Informed choices: Photos help customers quickly decide what to order and assure them of the food's quality.
More engagement: Visuals are more engaging than text, drawing customers' attention.
Higher sales: Attractive photos can make customers hungrier, potentially increasing their order size and your profits.
If you would like to know more, head over to How to add or edit my menu photos on Wolt.
What is the Merchant Portal?
The Wolt Merchant Portal is an all-in-one platform. Some key actions that you can take on the Merchant Portal include:
Analyze sales data
Update your opening hours
Edit your menu
Create campaigns
Download all your invoices
💡 Tip: Bookmark the Merchant Portal for easy access!
What is the Merchant App?
The Wolt Merchant App is your go-to tool for managing live orders at your store with ease. Some key actions you can take from the Wolt Merchant App include:
Accepting and managing regular and scheduled orders
Rejecting orders and how to avoid auto-rejections
Temporarily close your venue
Contact a customer regarding their order
Contact Wolt support about an order