Get started with the Wolt Merchant App
Learn the basics of using the Wolt Merchant App and get directed to in-app self-serve training to manage orders and streamline your store’s operations.
Overview
- How to log into the Merchant App
- What if I forget my login information?
- Understanding the Merchant App
- Understanding orders on the Merchant App
- How to manage orders on the Merchant App
- Rejecting orders on the Merchant App
- How to manage opening times
- How do I contact Wolt support from the Merchant App?
- How to choose my preferred sound notification
The Wolt Merchant App is your go-to tool for managing orders on the fly. While we’ll cover the basics here, be sure to log in to your app for a complete self-serve training experience and discover all the tools available to keep your operations running smoothly.
How to log into the Merchant App
Create your login credentials via the Merchant Portal, or use the credentials provided by your Wolt account manager.
If multiple members use the app, you can add additional user accounts by:
Heading to “Access management” in the Merchant Portal.
Selecting “Merchant App users”
Assigning roles based on what parts of the app they need to access.
What if I forget my login information?
Forgot your Merchant App login details? No problem. You can reset your password in just a few easy steps:
Log in to the Merchant Portal
From the left-hand menu, go to Access Management
Open the Merchant App Users tab at the top of the page
Find the correct user and click on the three dots.
Select Reset Password and confirm
You will now receive a new password. Don’t forget to write it down somewhere safe!
Your username is always displayed in bold above the password.
If you’re unsure how to log in to the Merchant Portal, follow our step-by-step guide: How to log in to the Merchant Portal.
Understanding the Merchant App
The “Active Orders” home screen is your control center, showing all your ongoing orders at a glance. It’s packed with the tools you need to keep everything running smoothly.
How to navigate the app
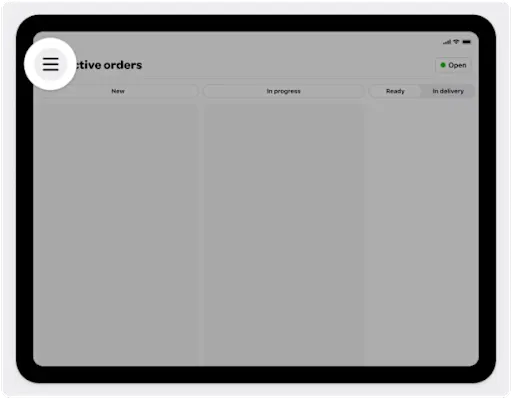
Tap the navigation icon to open the sidebar, where you’ll find everything you need at your fingertips, including:
Active Orders
Past Orders
Menu Editor
Merchant Manual
Wolt Support
Settings
How to view all ongoing orders
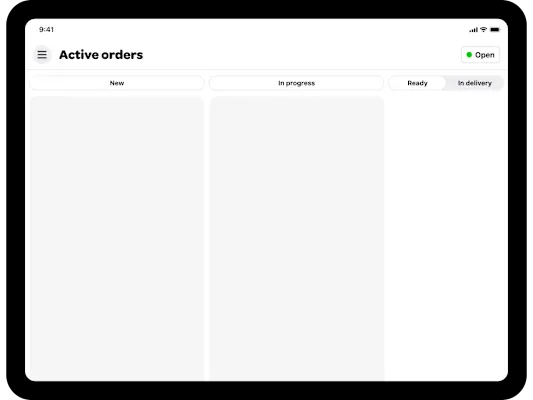
You can easily track all ongoing orders as they move through the columns, from “New” to “In Delivery,” as you accept and prepare them. It’s a smooth flow, keeping you in control every step of the way.
Understanding store availability
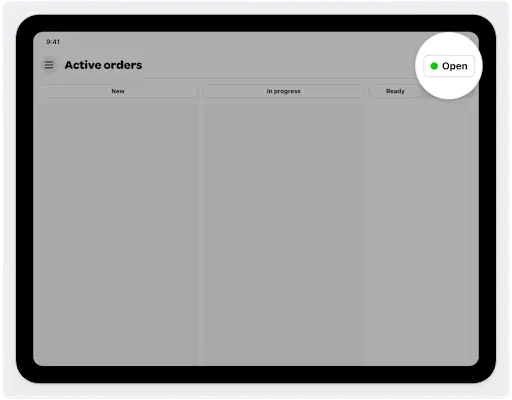
This button shows your venue’s current status. A green dot with “Open” means you’re ready to accept orders. Need a break? You can update your venue status anytime with just a tap.
Understanding orders on the Merchant App
The Wolt Merchant App provides all the key details you need to manage orders efficiently. Here’s a quick rundown:
How to understand order cards
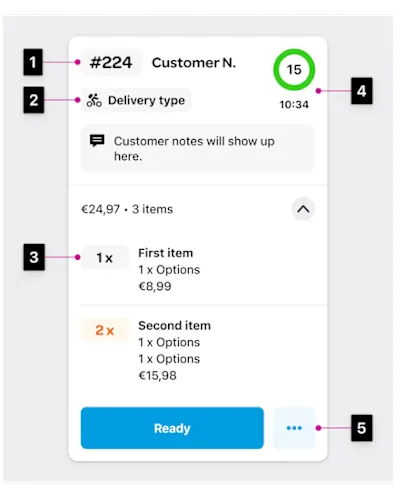
Order cards contain all the essential info for each order:
Order number: Attach it to the packaging for easy identification.
Delivery type: Whether it’s pickup or delivery.
Ordered items: A detailed list of everything the customer ordered.
Preparation time: Shows how long you have to prep before delivery.
Order details: Tap the icon for more info like item photos or printing options.
How to differentiate between order types
There are two main order types that require different approaches:
Common orders: Must be accepted within 3 minutes to avoid auto-rejection.
Scheduled orders: Set for a later time, giving you 15 minutes to confirm once your store is open.
💡Tip: Once you accept a scheduled order, it moves to the “Scheduled” tab. You’ll get a notification when it’s time to start prepping, just like any other order.
How to manage different delivery types
Wolt delivery: Accept within 3 minutes or the order is auto-rejected.
Self delivery: Use your own couriers for delivery.
Pick up: The customer will collect their order from your venue.
How to manage orders on the Merchant App
Managing orders is a breeze with the Merchant App. From accepting orders to handing them off, here’s a quick look at the flow.
How to accept an order
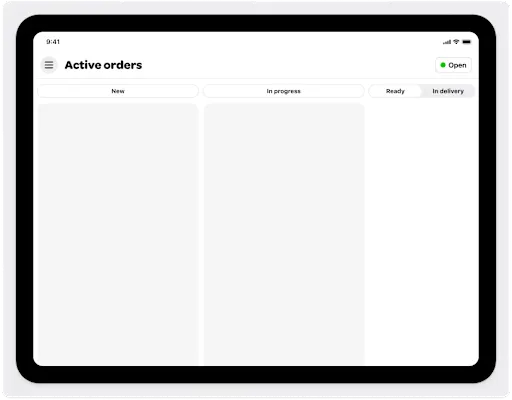
ℹ️ First things first: Keep your Merchant App open at all times. If it’s closed, your business will appear offline to customers, and you won’t receive any orders.
When a new order comes in, you’ll get a notification—just tap “Accept” to confirm.
Be sure to accept within 3 minutes to avoid auto-rejection. Review the suggested prep time or adjust it if needed. Your customer will be informed about your estimated preparation time.
How to prepare an order
Once you accept an order, it moves to “In Progress”, and the countdown to courier arrival begins. Review order details using the “...” icon, and when it’s ready, tap “Ready” to notify the courier and customer.
💡Pro tip: If you have a printer, attach the order number to the package. Otherwise, just write it on the bag.
How to hand off an order
For delivery orders, check the estimated courier arrival time, and once delivered, the order moves to “Past Orders”. For pickups, tap “Picked Up” once the customer collects their order.
For more detailed guidance, check out the in-app self-serve training in your Merchant App.
Rejecting orders on the Merchant App
We aim to minimize order rejections, as they can lead to unhappy customers and fewer future orders. But if you need to reject an order, here’s how to do it:
How to reject an order
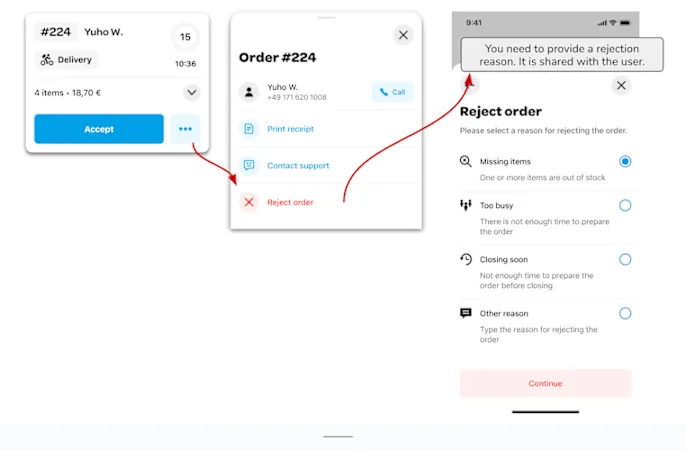
Tap the “...” icon on the order card
Select “Reject order” and choose a reason (shared with the customer).
Confirm by tapping “Continue”.
💡Tip: Before rejecting, consider other options like temporarily closing your store, disabling unavailable items, or reaching out to the customer. You can also contact Wolt Support if needed.
Rejection reasons
You’ll need to select a reason when rejecting an order:
Missing items: Something is out of stock.
Too busy: You don’t have the capacity to prepare the order right now.
Closing soon: It’s too close to your closing time to complete the order.
Other: Enter a custom reason that will be shared with the customer.
Want to learn more? Head to your Merchant App for detailed in-app self-serve training.
How to manage opening times
The app automatically opens and closes your venue based on the hours you set. Here’s how to keep things running smoothly.
General rules
Keep the app open during business hours—if it’s closed, your venue won’t appear to customers, and you won’t receive orders. Also, make sure the volume is up so you don’t miss notifications.
How to temporarily close your venue
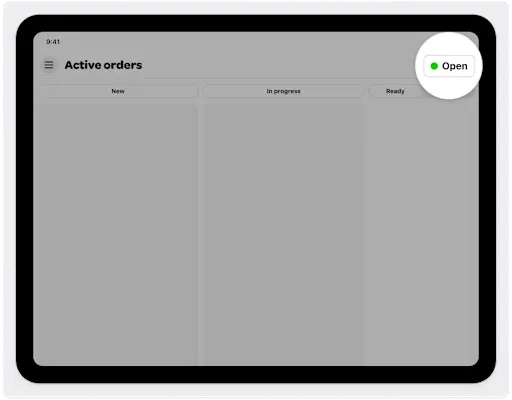
Need to step away for a bit? Tap the venue status button and choose to close for 30 minutes, 1 hour, or until your next scheduled opening.
For longer closures (like holidays), you can update your hours on merchant.wolt.com or contact Wolt Support.
How do I contact Wolt support from the Merchant App?
Need help? You can reach Wolt Support directly through the app in two simple ways:
Tap Contact Support from any order card.
Select Contact Support from the menu.
How to choose my preferred sound notification
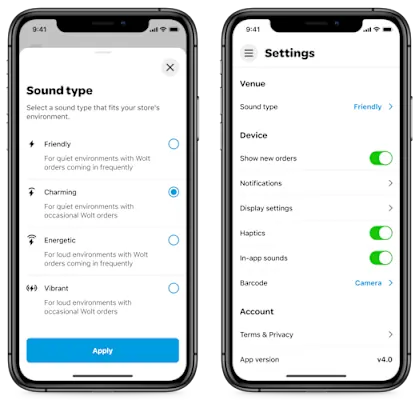
Selecting the right sound setting helps ensure you never miss an order. You can choose from several sound options based on your preferences or store environment. By selecting a sound that stands out, you reduce the risk of missing orders and the risk of auto-rejections.
For more in-depth guidance, check out the in-app self-serve training in your Merchant App.